Getting Started
Overview
ECCHO Live Sync allows you to easily sync the relevant BIM data to ECCHO and then sync any updates made in ECCHO back to the BIM.
The typical workflow using ECCHO Live Sync is as follows:
- Create an ECCHO data file to sync with using the Export feature within ECCHO.
- In Revit, press the Initial Project Setup button to automatically create the required ECCHO Parameters within the BIM to store ECCHO data.
- In Revit, select the ECCHO data file you exported from ECCHO earlier to associate it with the BIM.
- In Revit, Export the BIM to the ECCHO data file and then use the Import feature within ECCHO to import the updated data file.
- Review the performance results in ECCHO, make adjustments as required, then re-export the updated data file again.
- In Revit, Import the updated data file to sync the updated ECCHO data with to the BIM.
- Continue developing your design in either Revit or ECCHO and sync the design changes as you go!
The ECCHO Live Sync Tool Bar

Instructions:
A shortcut to this online help page.
Initial Project Setup:
Automatically creates Parameters within the project to store ECCHO specific information.
Automatically creates 3D Views & Schedules within the project for easy analysis and modification of the relevant ECCHO data.
Automatically loads the Linear Thermal Bridge Family Object into the project ready to use.
Parameters will have the prefix ‘ECCHO’ for easy identification and are grouped under ‘Energy Analysis.’
Parameters will be created within ‘Project Information’, as well as for Floors, Walls, Ceilings, Roofs, Doors, Windows, and Room elements.
3D Views and Schedules will have the prefix ‘ECCHO Live Sync’.
Select ECCHO Data File:
Allows you to select the ECCHO Data File that you would like to Sync with.
The File Name and Path of the file will be stored in the Project Information under the parameter ‘ECCHO Data File’ for reference.
Export Data to ECCHO:
Exports the BIM data to the ECCHO data file.
ECCHO Live Sync will overwrite any existing data in the file with the current BIM data.
(A backup file is created first though if it is required.)
Import Data from ECCHO:
Imports data from the ECCHO data file into the BIM.
Any values changed in ECCHO are updated to the relevant ECCHO parameters within the BIM.
Family Objects:
A shortcut to the online library of family objects that have been designed for easy use with ECCHO Live Sync.
Activate License:
Opens the Licensing information for using ECCHO Live Sync.
Initial Setup
You can create a new Revit Project using your own Project Template, using the default Revit Architectural Template, or you can use an existing Revit Project.
You can use either Metric or Imperial units for your project, however units will be automatically converted to Metric when synced with the ECCHO data file.
Firstly, press the Initial Project Setup button on the ECCHO Live Sync toolbar.
ECCHO Live Sync will then automatically create the required custom parameters within the Revit project. These custom parameters will store data for syncing with ECCHO, such as the element description or orientation to North.
The custom parameters are grouped under ‘Energy Analysis’ and will have the ‘ECCHO’ prefix for easy identification. The relevant custom parameters will be applied to all Floors, Walls, Ceilings, Roofs, Doors, Windows, and Room elements within the Revit Project.
ECCHO Live Sync will then automatically create a 3D view called ‘ECCHO Live Sync – Synced Elements’ within the Revit project. Later, you can use this view to see all the elements that are set to sync with ECCHO and which elements are not.
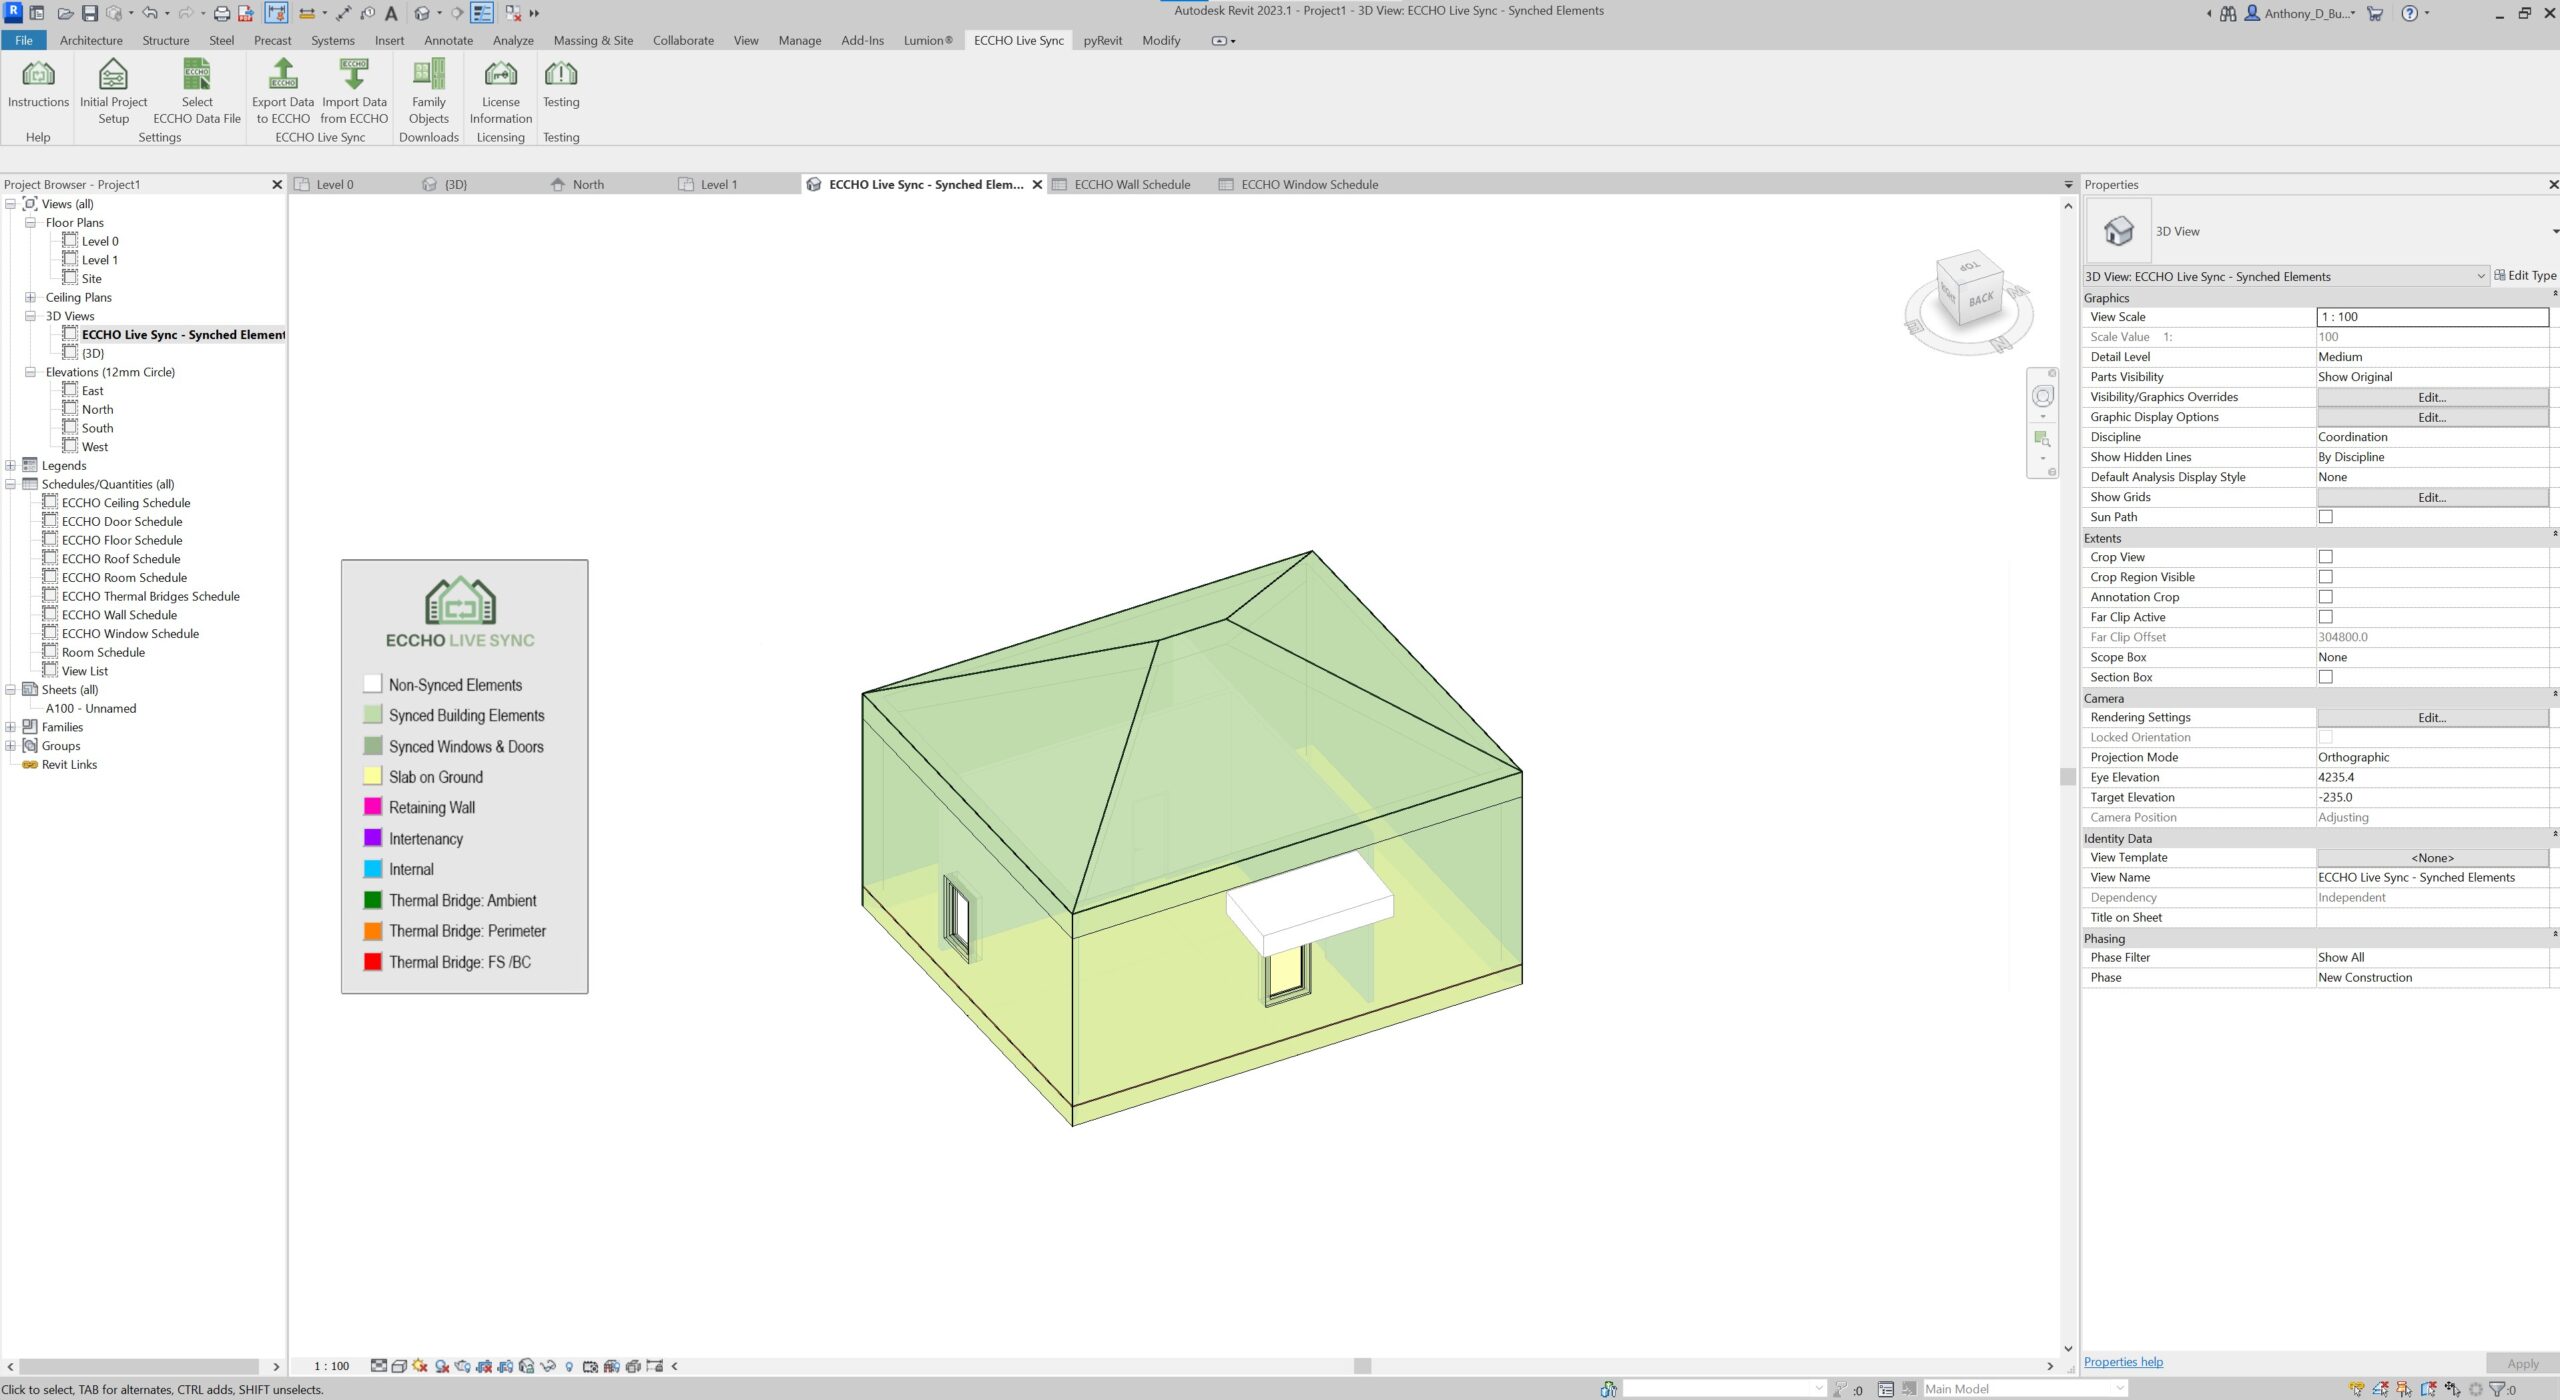
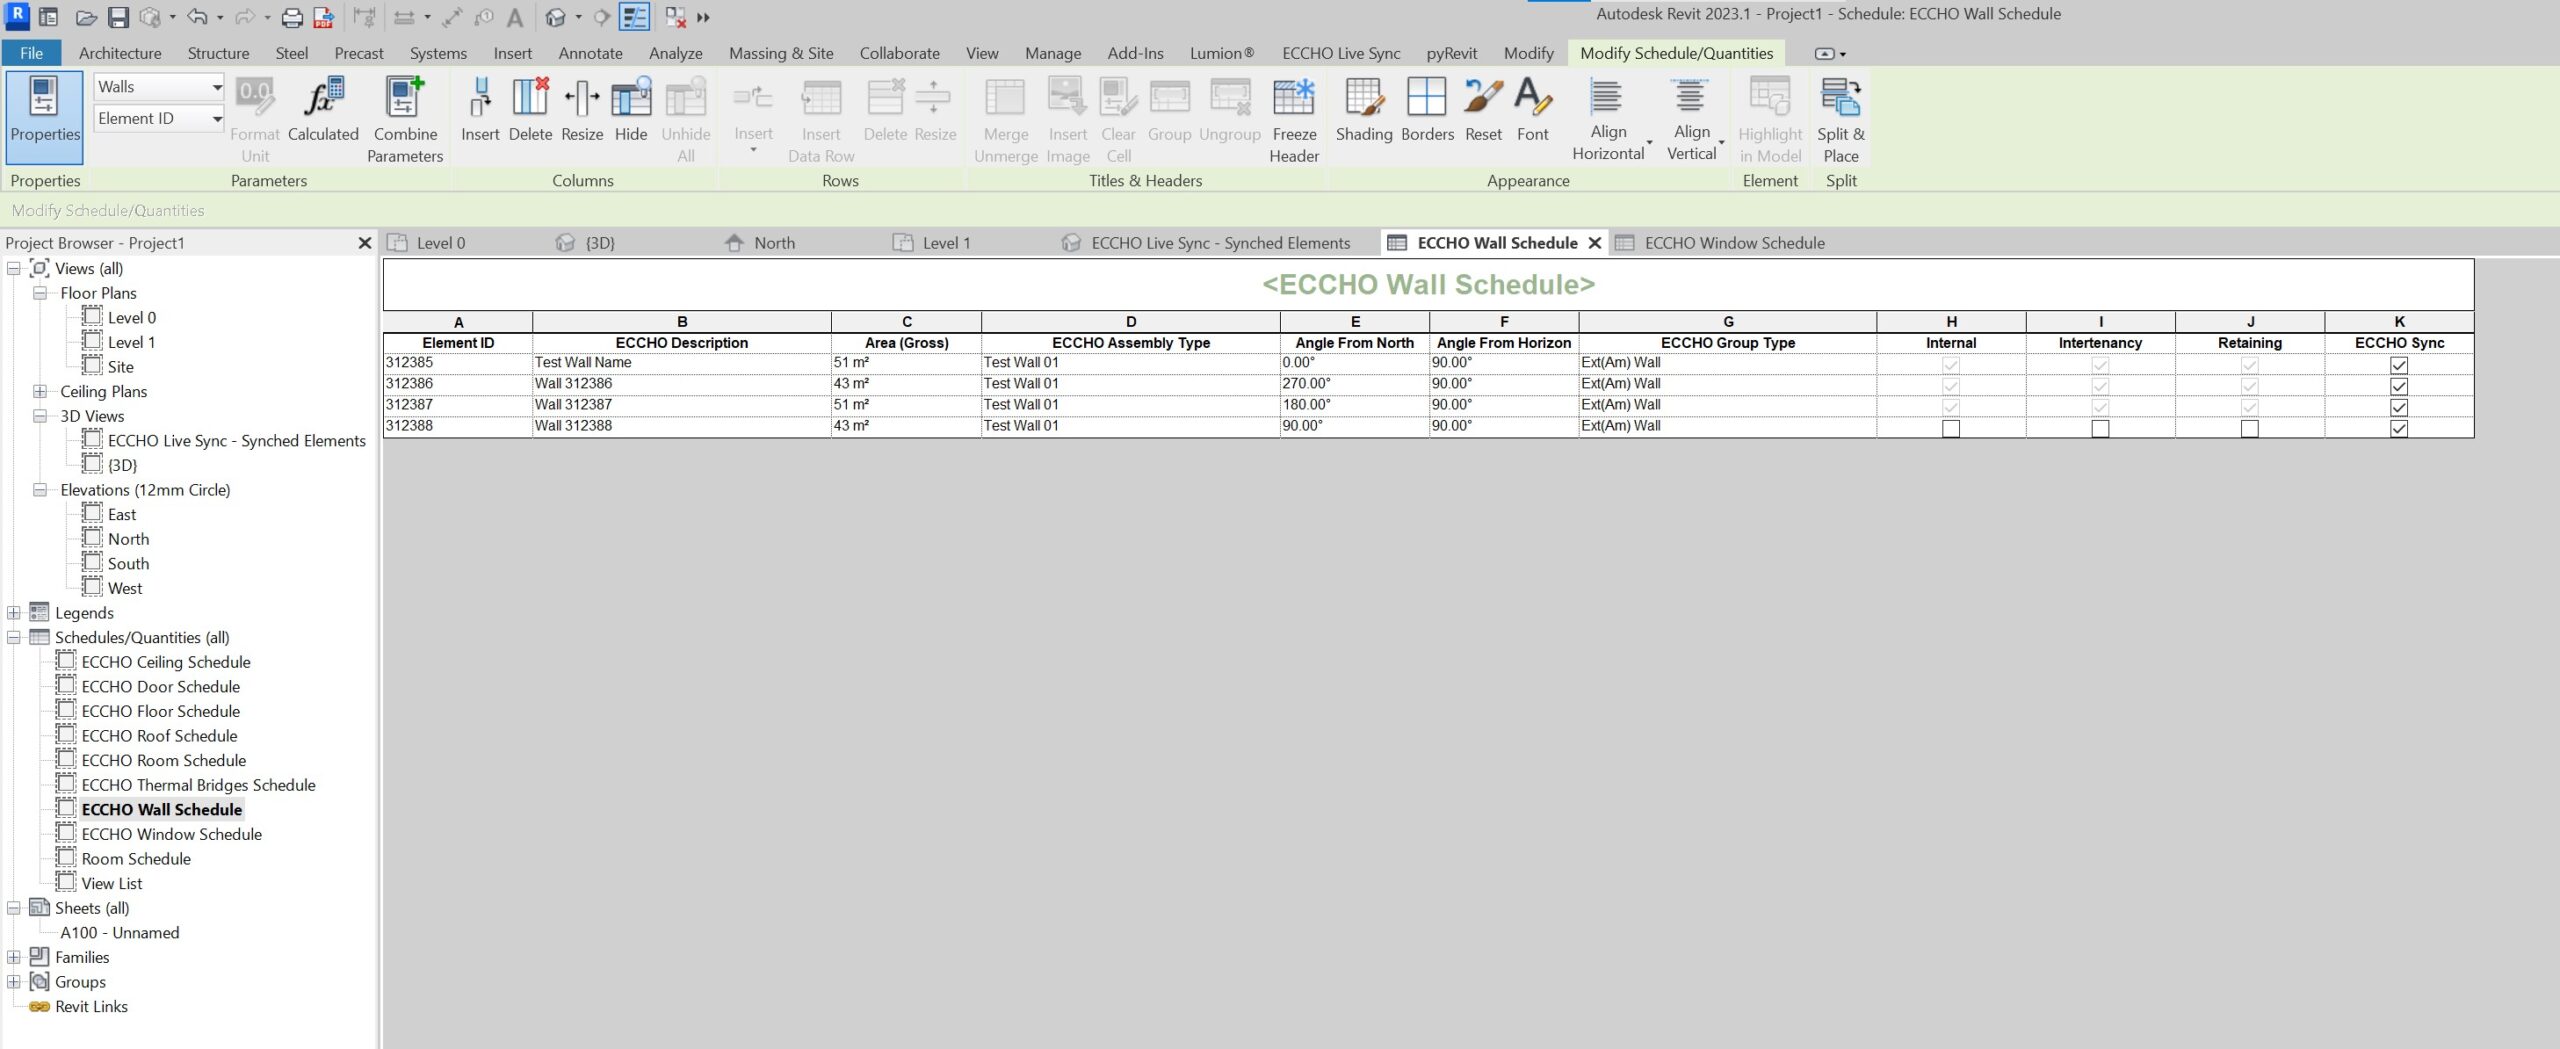
ECCHO Live Sync will also then automatically create several schedules within the Revit project that display the same data that appears in ECCHO.
The schedules have the prefix ‘ECCHO ’ with a schedule created for the following elements:
- Floors
- Walls
- Ceilings
- Roofs
- Windows
- Doors
- Thermal Bridges
Later, you can use these schedules to more quickly manipulate the various parameters for all the elements in the project.
Create a new Dwelling within ECCHO and export a data file ready to sync with.

Select the ECCHO data file by clicking the ‘Select ECCHO Data File’ button in Revit on the ECCHO Live Sync Toolbar
Selecting Elements to Sync
Elements that form part of the Thermal Envelope of the building should be synced with ECCHO by checking the ‘ECCHO Sync’ checkbox parameter.
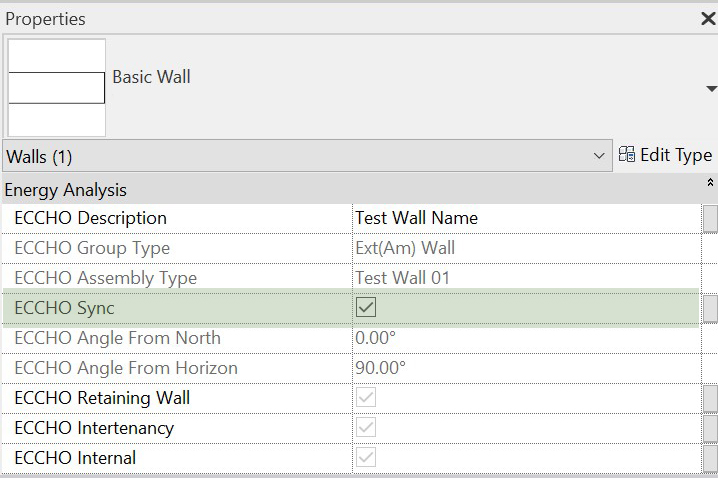
Elements that are not checked will be ignored by ECCHO Live Sync. As an example, you would not check internal walls as they generally do not form part of the Thermal Envelope.
You can use the automatically created ‘ECCHO Live Sync – Synced Elements’ 3D view to easily see what elements have and have not been set to sync with ECCHO.
Creating Walls
When creating walls, you are free to create them by drawing in either a clockwise or anti-clockwise direction. You can also duplicate them, mirror them, or otherwise manipulate them as desired.
Please note that you will need to set the ‘Wall Joins’ of the walls that form the Thermal Envelope to ‘Miterd’ so that Revit correctly calculates the entire wall area and does not subtract the thickness of the adjacent connected wall.
If you forget to miter the wall joins, ECCHO Live Sync will warn you and offer to automatically change the wall joins to mitered for you.

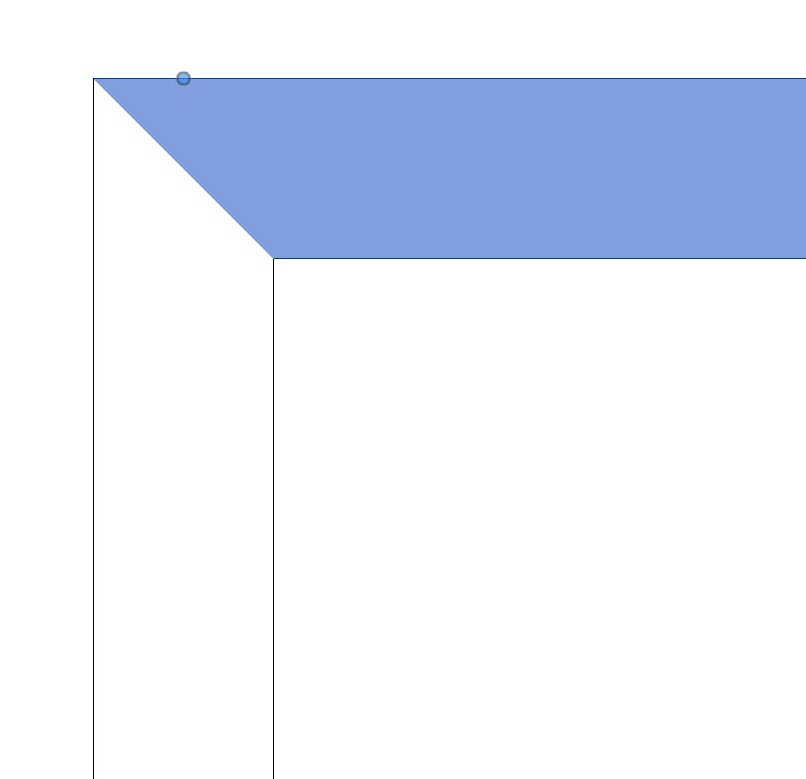
Please also note that the wall area Revit displays for walls are always taken from the ‘Exterior Side’ of the wall and are net areas, with the areas of any cut outs for doors or windows subtracted.
Because the ECCHO requires gross wall areas, ECCHO Live Sync will calculate the gross wall area for you by adding the areas of any doors or windows to the net wall area calculated by Revit.
The bottom of the wall should extend down through the thickness of the Floor that forms the bottom of the Thermal Envelope, and the top of the wall should also extend through the thickness of the Ceiling or Roof element that forms the top of the Thermal Envelope so that the surfaces that determine the areas meet with each other.
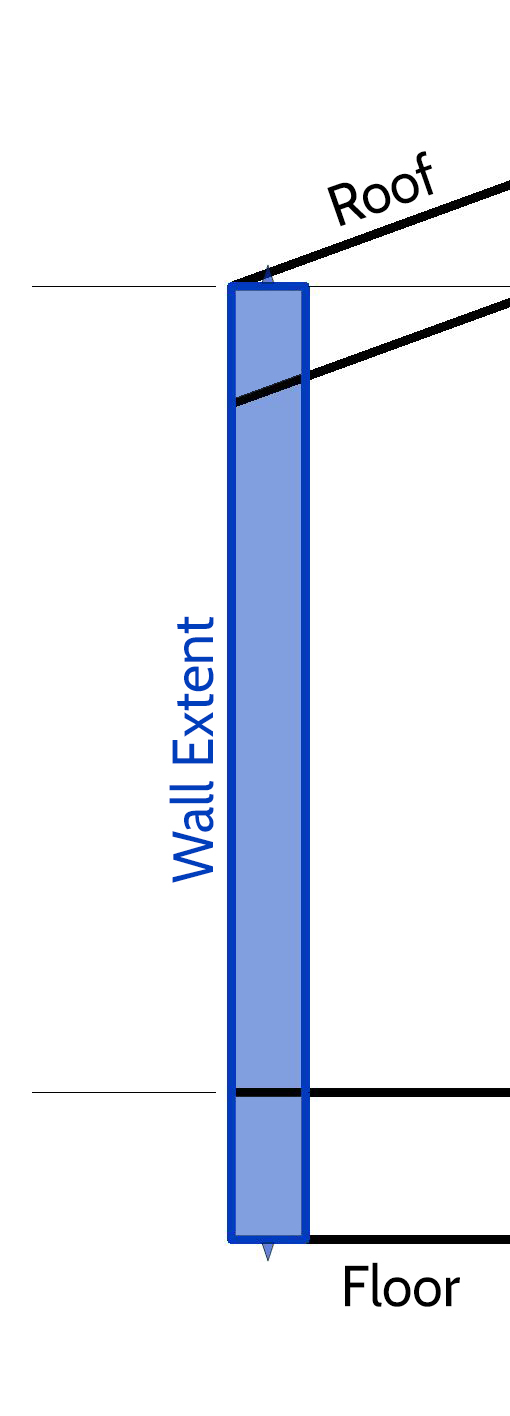
Once the walls are created, the appropriate values for the ECCHO parameters can be entered, these include:
- Description. (If left blank, a default name will be created based on the Wall’s ID number in Revit.)
- Retaining Wall (Yes / No)
- Intertenancy Wall (Yes / No)
- Internal Wall (Yes / No)
Once the walls have been synced to ECCHO, these values can be changed in ECCHO to update the parameter values in the Revit Model by clicking the ‘Import Data from ECCHO’ button.
The following parameters are locked in Revit and can only be updated within ECCHO as they require specific values to be chosen:
- Group Type
- Assembly Type
- Selection building element.
The following values will be calculated by ECCHO Live Sync automatically:
- Quantity.* (This will always be 1 as each element is entered individually by ECCHO Live Sync into ECCHO.)
- Area.*
- Angle from Horizon.*
- Angle from North.*
* If these values are changed in ECCHO they will not be used to updated the BIM.
Creating Floors
Floors that form part of the Thermal Envelope should be drawn so that their perimeter extends to the exterior lines of the walls so that the surfaces that determine the areas meet with each other.
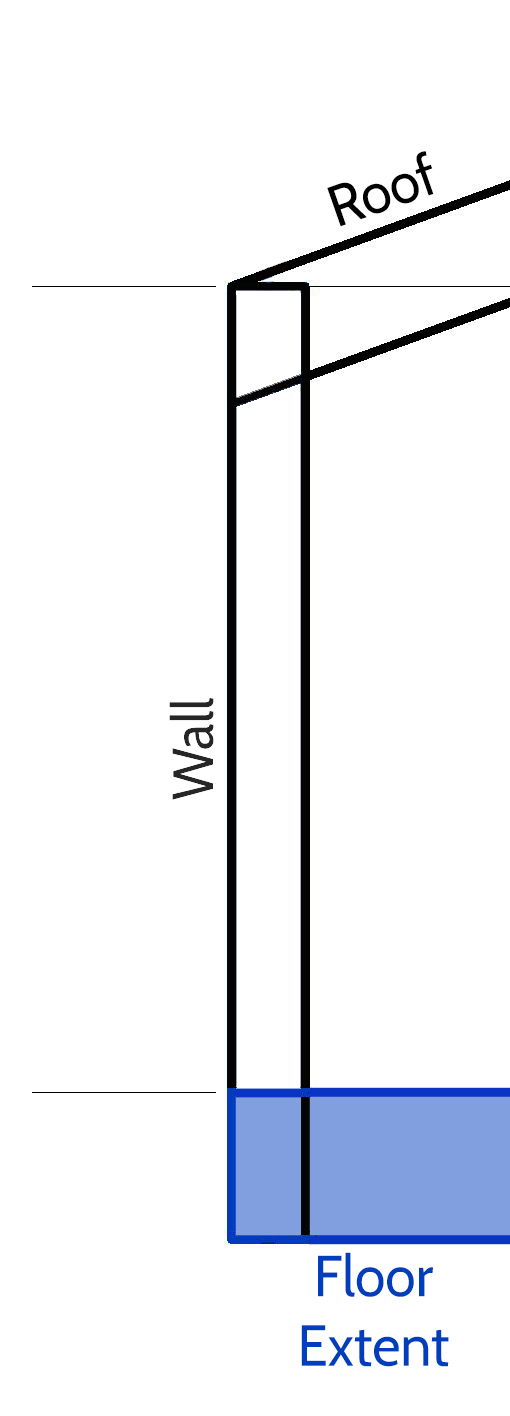
Once the floors are created, the appropriate values for the ECCHO parameters can be entered, similar to walls.
If the ‘Description’ is left blank, a default name will be created based on the Floor’s ID number.
Select if the Floor a Slab on Ground or if it is an Intertenancy or Internal Floor as appropriate.
Creating Ceilings
Ceilings that form part of the Thermal Envelope should be drawn so that their perimeter extends to the exterior lines of the walls so that the surfaces that determine the areas meet with each other.
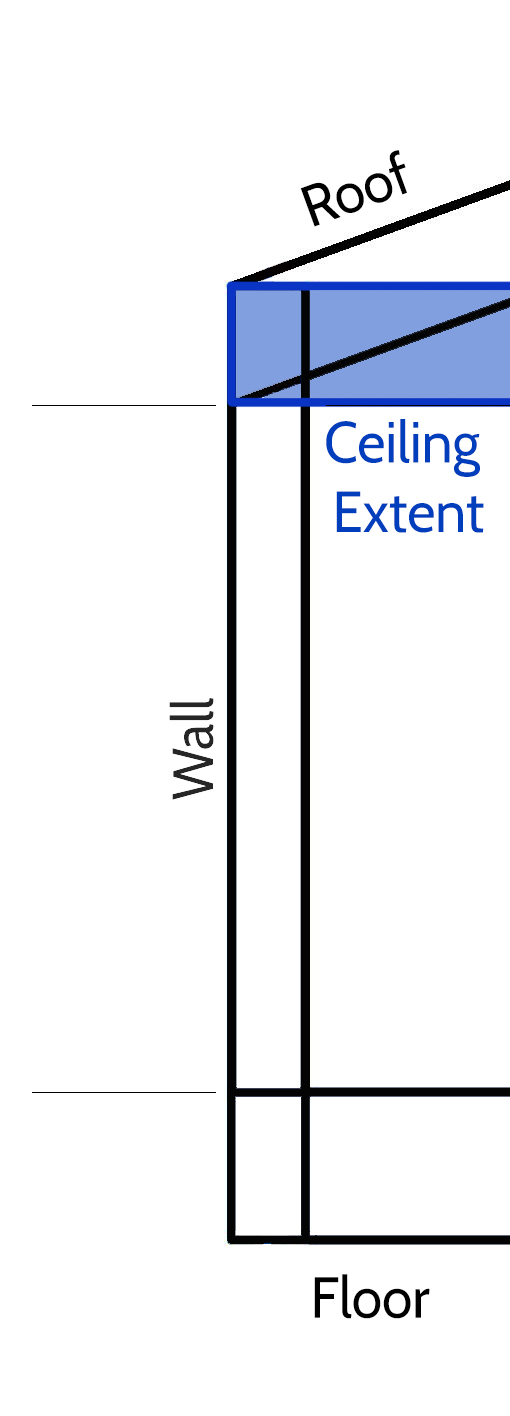
Once the ceilings are created, the appropriate values for the ECCHO parameters can be entered, similar to floors.
If the ‘Description’ is left blank, a default name will be created based on the Ceiling’s ID number.
Select if the Ceiling is an Intertenancy or Internal Ceiling as appropriate.
Creating Roofs
Roofs that form part of the Thermal Envelope should be drawn so that their perimeter extends to the exterior lines of the walls so that the surfaces that determine the areas meet with each other.
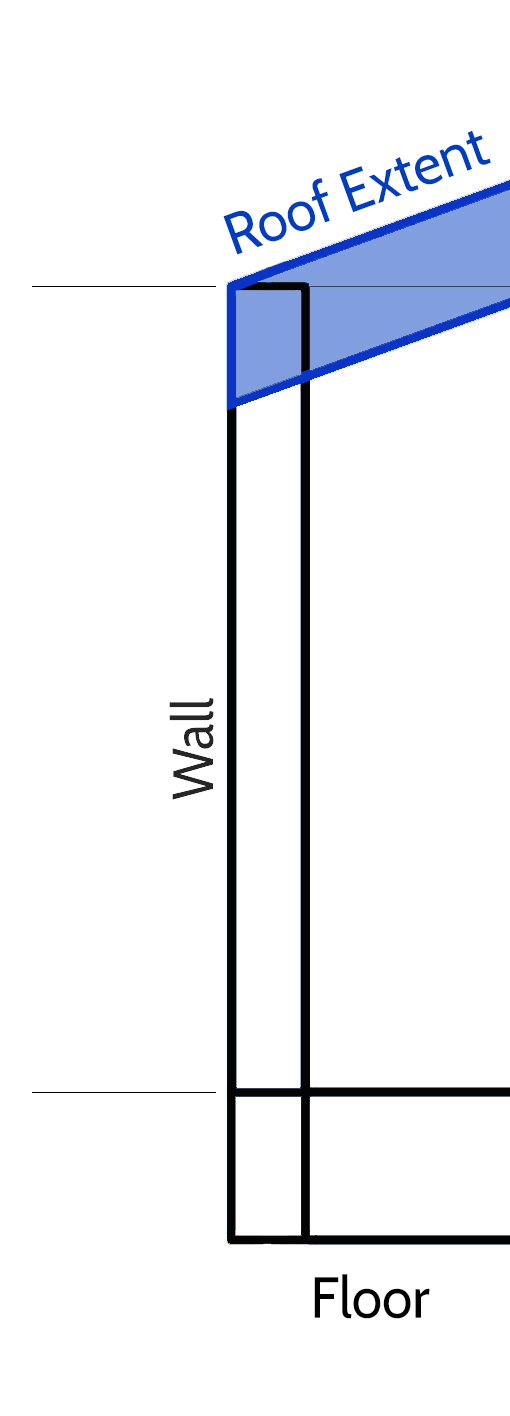
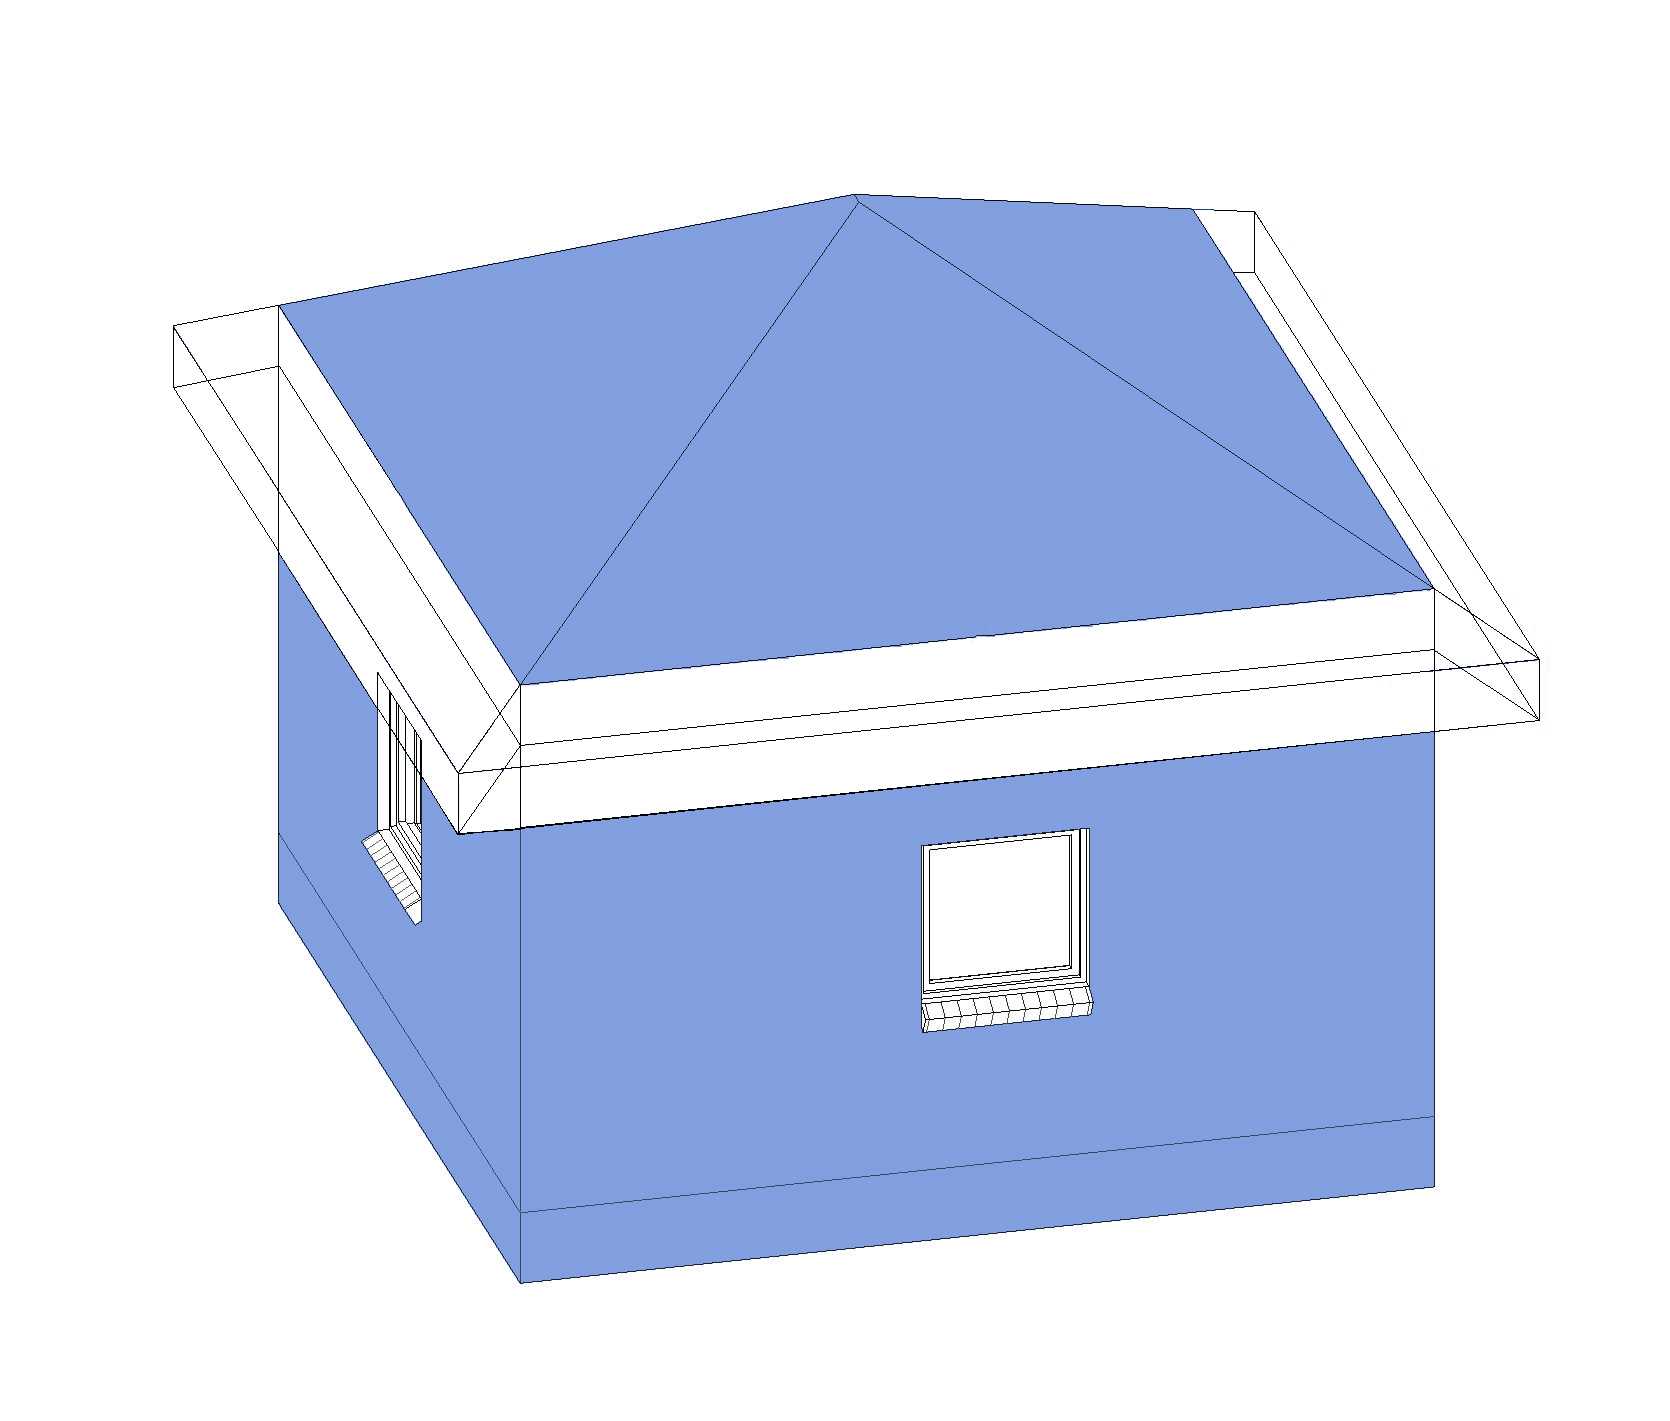
Eaves or other similar roof overhangs that are not part of the Thermal Envelope need to be created as a separate roof elements so that their areas are kept distinct from other roofs elements that are part of the Thermal Envelope.
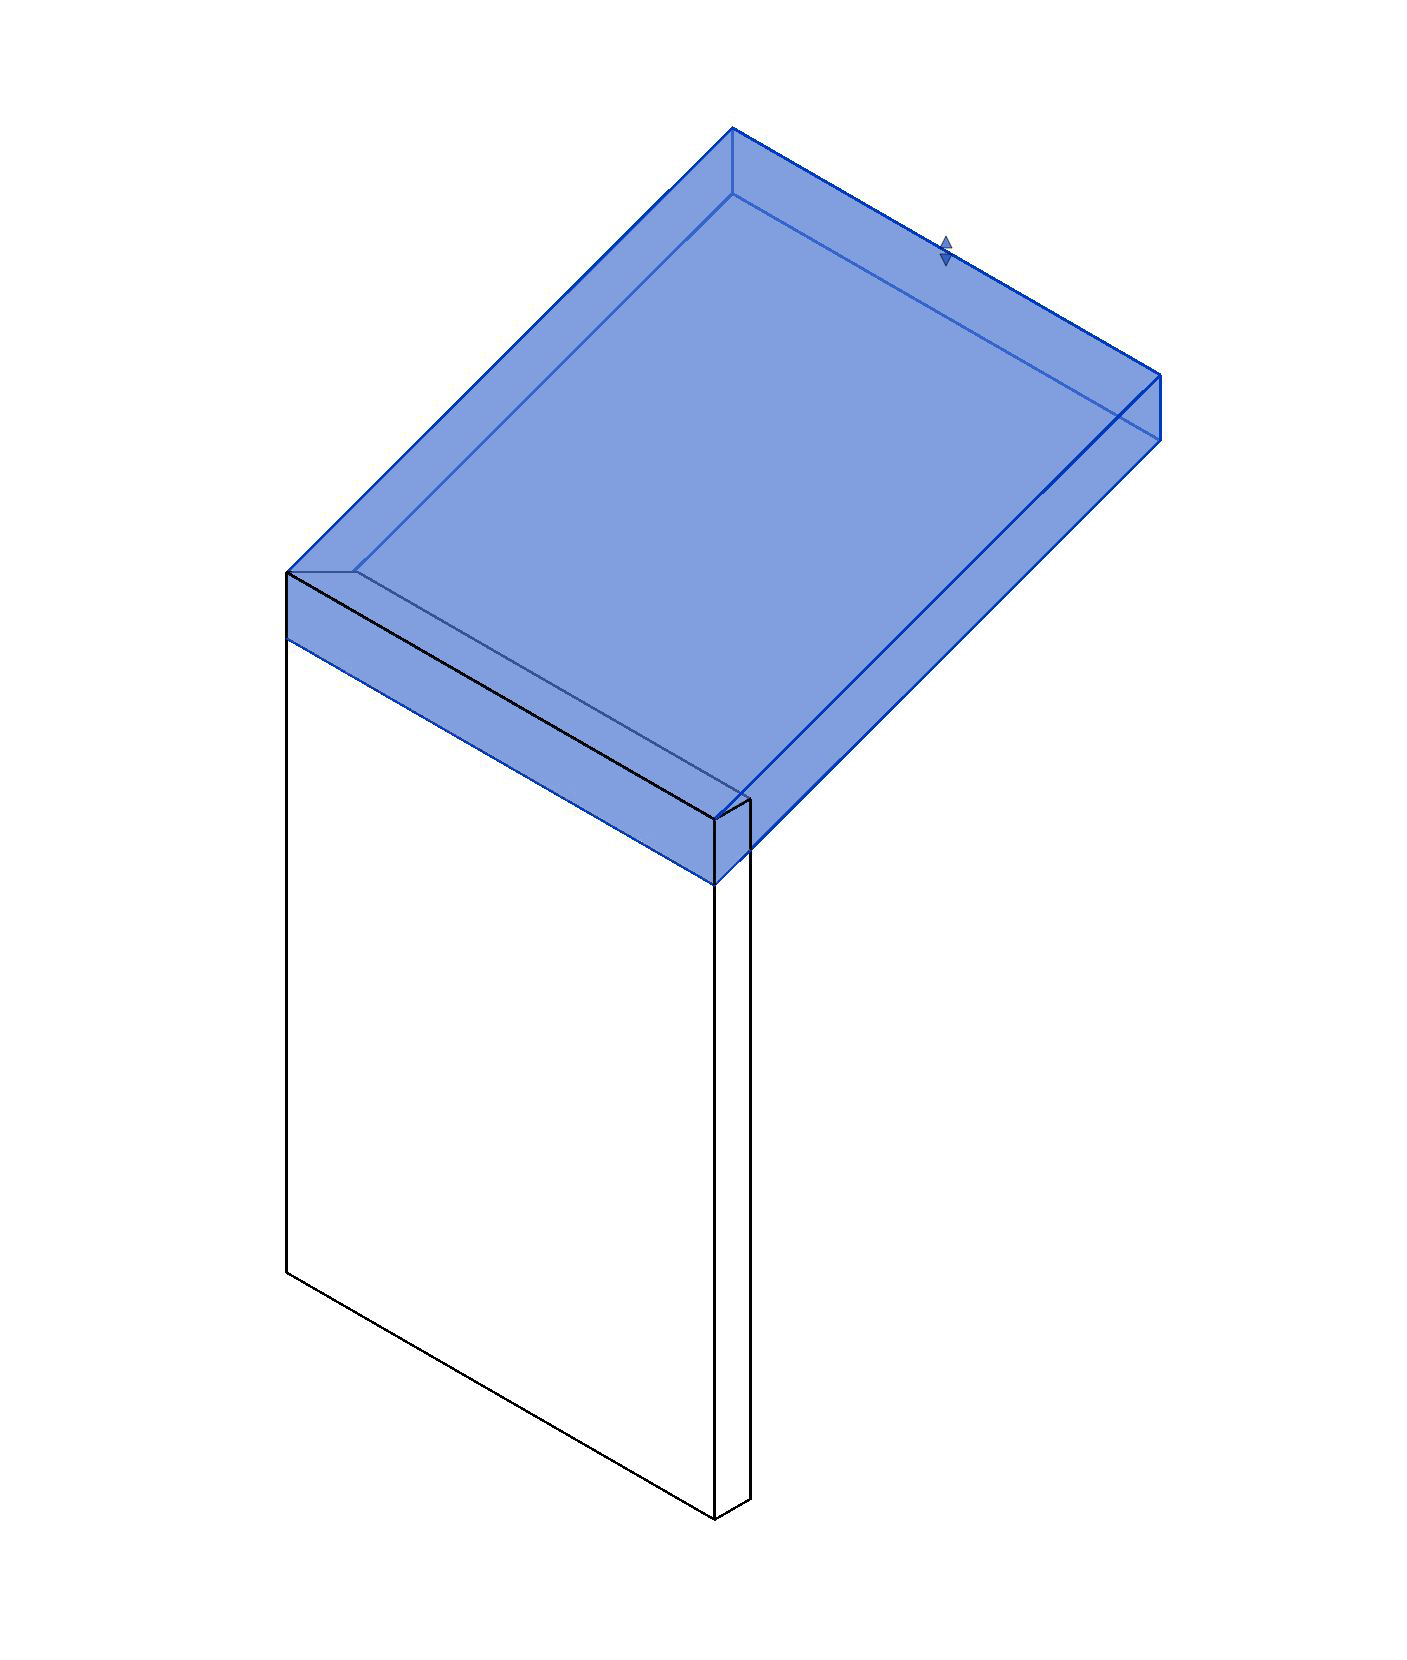
The roof element and its area will be synced with ECCHO as one entry for roofs types that pitch from one side only (i.e. skillion roofs) and the orientation to north will be calculated accordingly.
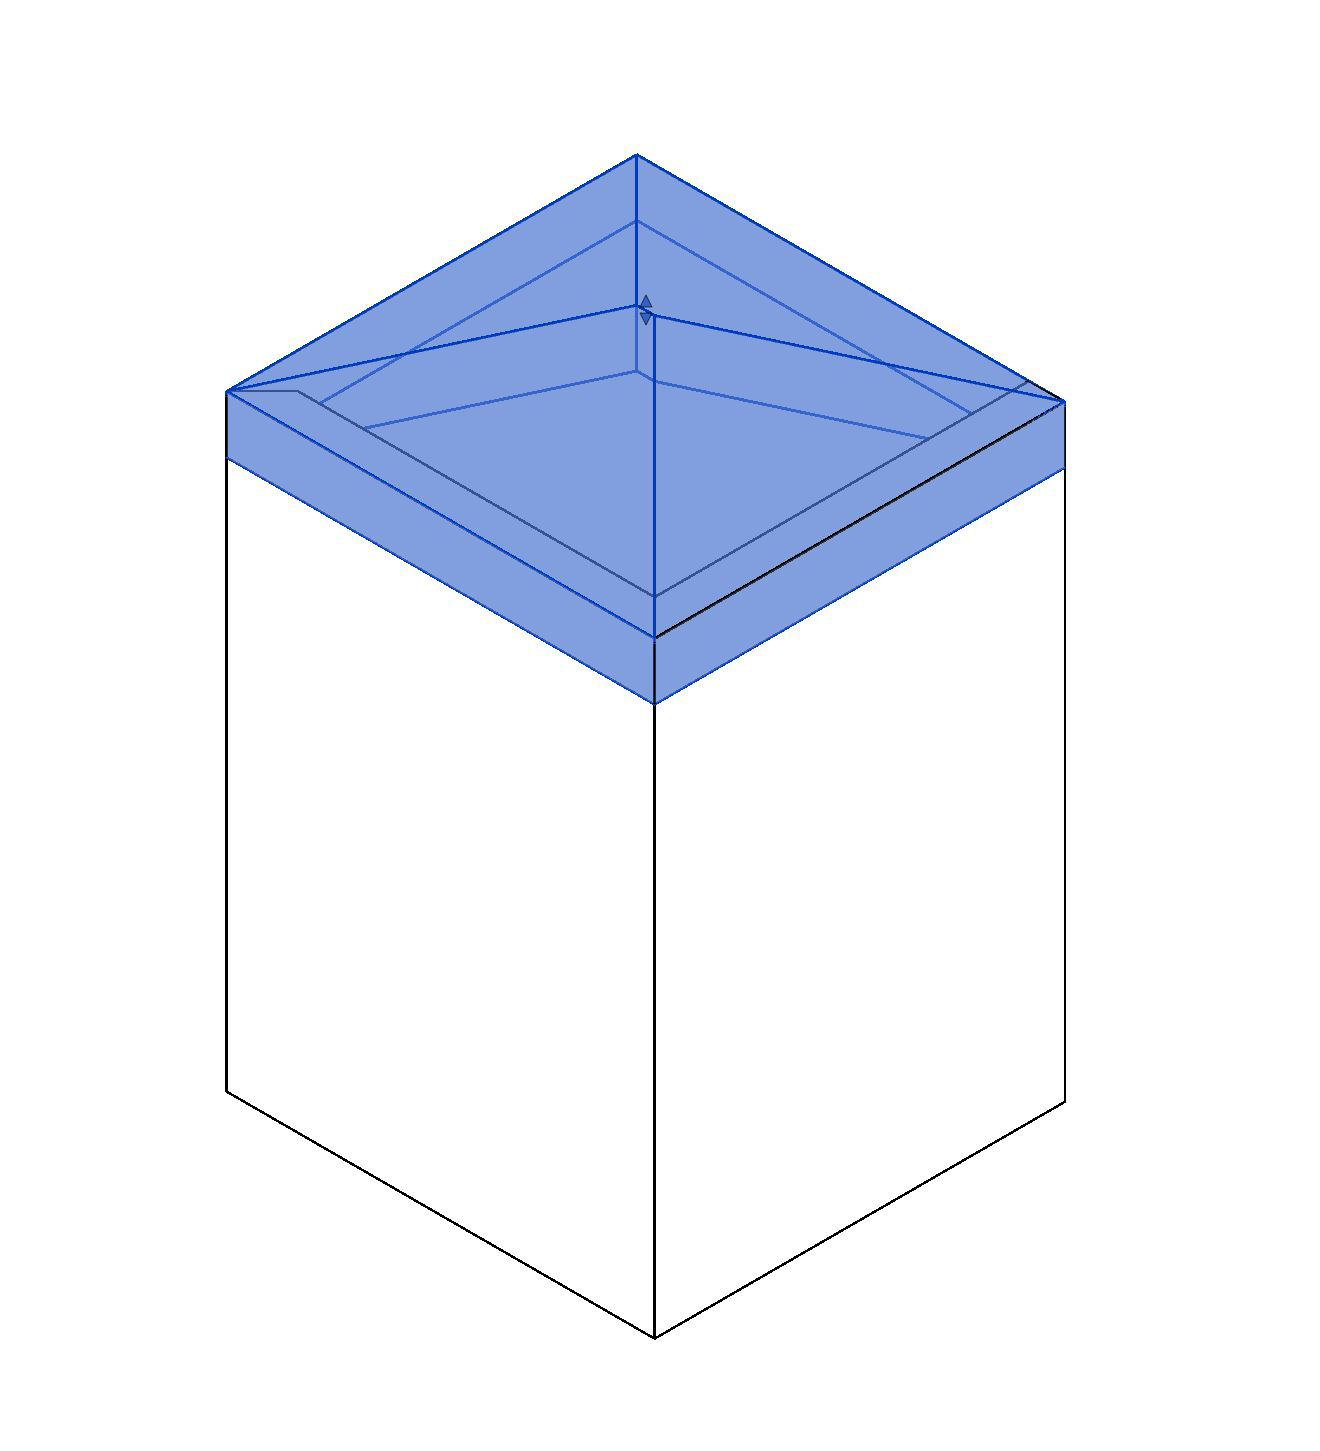
For roofs that pitch from more than one side (i.e. hipped roofs or gable roofs) the roof’s areas and orientation to north will be calculated separately for each roof surface and will be entered into the ECCHO as ‘Roof 1 – Surface 1, Roof 1 – Surface 2’ etc.
Please also note that the areas Revit displays for roofs are always net areas, with the areas of any cut outs for roof windows/skylights subtracted. ECCHO requires gross roof areas, so ECCHO Live Sync will calculate the gross roof area for you by adding the areas of any roof windows/skylights to the net roof area calculated by Revit.
Once the roofs are created, the appropriate values for the ECCHO parameters can be entered, similar to walls.
If the ‘Description’ is left blank, a default name will be created based on the Roof’s ID number.
The roof surfaces ‘Angle from Horizon’ will be calculated based on the pitch of the roof.
Windows and Doors
Any window or door family object can be used with ECCHO Live Sync and the required ECCHO parameters will be created for them when you click the ‘Initial Project Setup’ button.
Use the family objects specifically created for ECCHO Live Sync for improved functionality. These can be downloaded here.
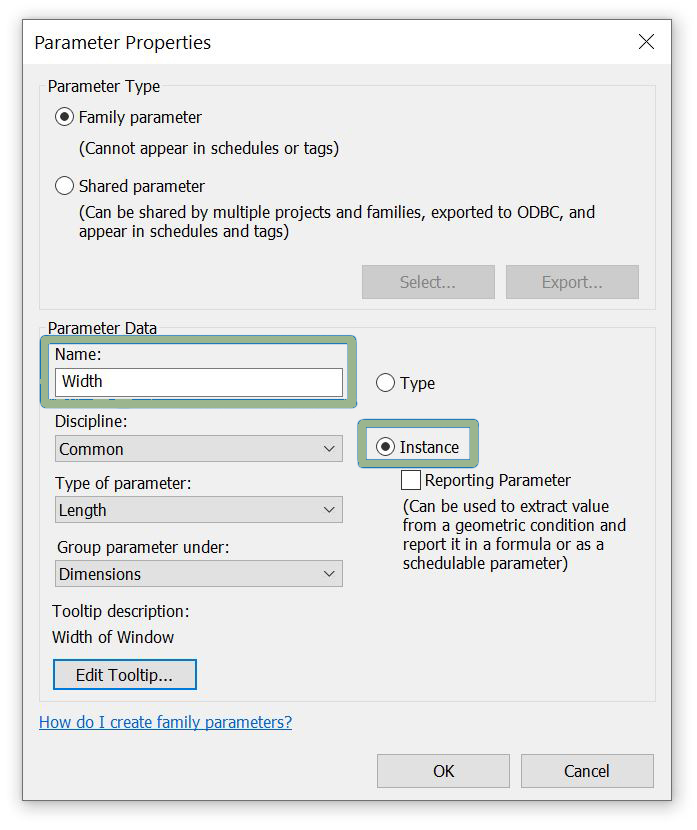
If you use family objects that have ‘Instance’ parameters for the width and height, then changing the width and height values within ECCHO will flex the family object accordingly in Revit when you next sync. (Family objects with their width and height assigned by ‘Type’ parameters are not able to be flexed.)
Once the windows and doors are created, the appropriate values for the ECCHO parameters can be entered, these include:
- Description. (If left blank, a default name will be created based on the Window’s/Door’s ID number in Revit.)
- Winter Sun Admitted
- Summer Sun Admitted
- Shade Depth #
- Shade Height #
Once windows and doors have been synced to ECCHO, these values can be changed in ECCHO to update the parameter values in the BIM by clicking the ‘Import Data from ECCHO’ button.
# These values can be easily and accurately changed by moving the reference lines built-in to the ECCHO Window Family Object.
The following parameters are locked in Revit and can only be updated within ECCHO as they require specific values to be chosen:
- Glazing Type.
- Frame Type.
The following values will be calculated by ECCHO Live Sync automatically:
- Quantity.* (This will always be 1 as each element is entered individually by ECCHO Live Sync into ECCHO.)
- Installed In.
- Angle From North
- Angle From Horizon
Roof Windows/Skylights
Any roof window/skylight family object can be used, though you must have the ‘Category’ of the family set to ‘Window.’ (Some roof window/skylight family objects are created as ‘Generic Model – Roof Based’ or similar, and therefore won’t have the required ECCHO parameters applied to them and will be ignored by ECCHO Live Sync if they are not categorised as windows.)
Roof windows/skylights that have ‘Instance’ parameters for the height and width will give you the ability to change the width and height values within ECCHO and the object will flex accordingly in Revit when synced. (Family objects with their width and height assigned by ‘Type’ parameters are not able to be flexed.)
Once the roof windows/skylights are created, the appropriate values for the ECCHO parameters can be entered, similar to windows and doors.
If the ‘Description’ is left blank, a default name will be created based on the roof window’s/skylight’s ID number.
Thermal Bridges
Use the Linear Thermal Bridge family object created specifically for ECCHO Live Sync to trace the Linear Thermal Bridges in the BIM and then select their type, either ‘Ambient’ ‘Perimeter’ or ‘Floor Slab.’
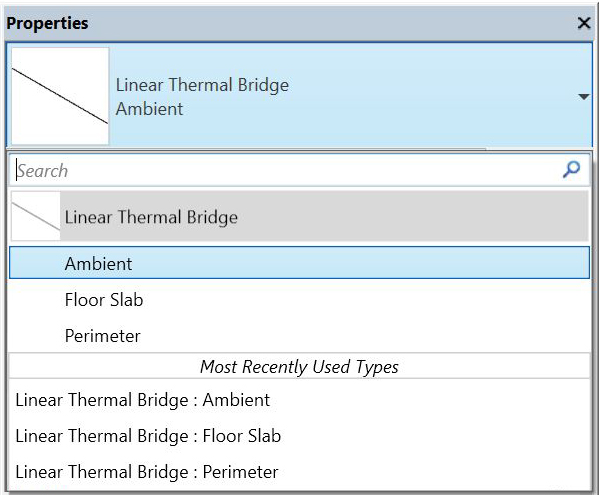
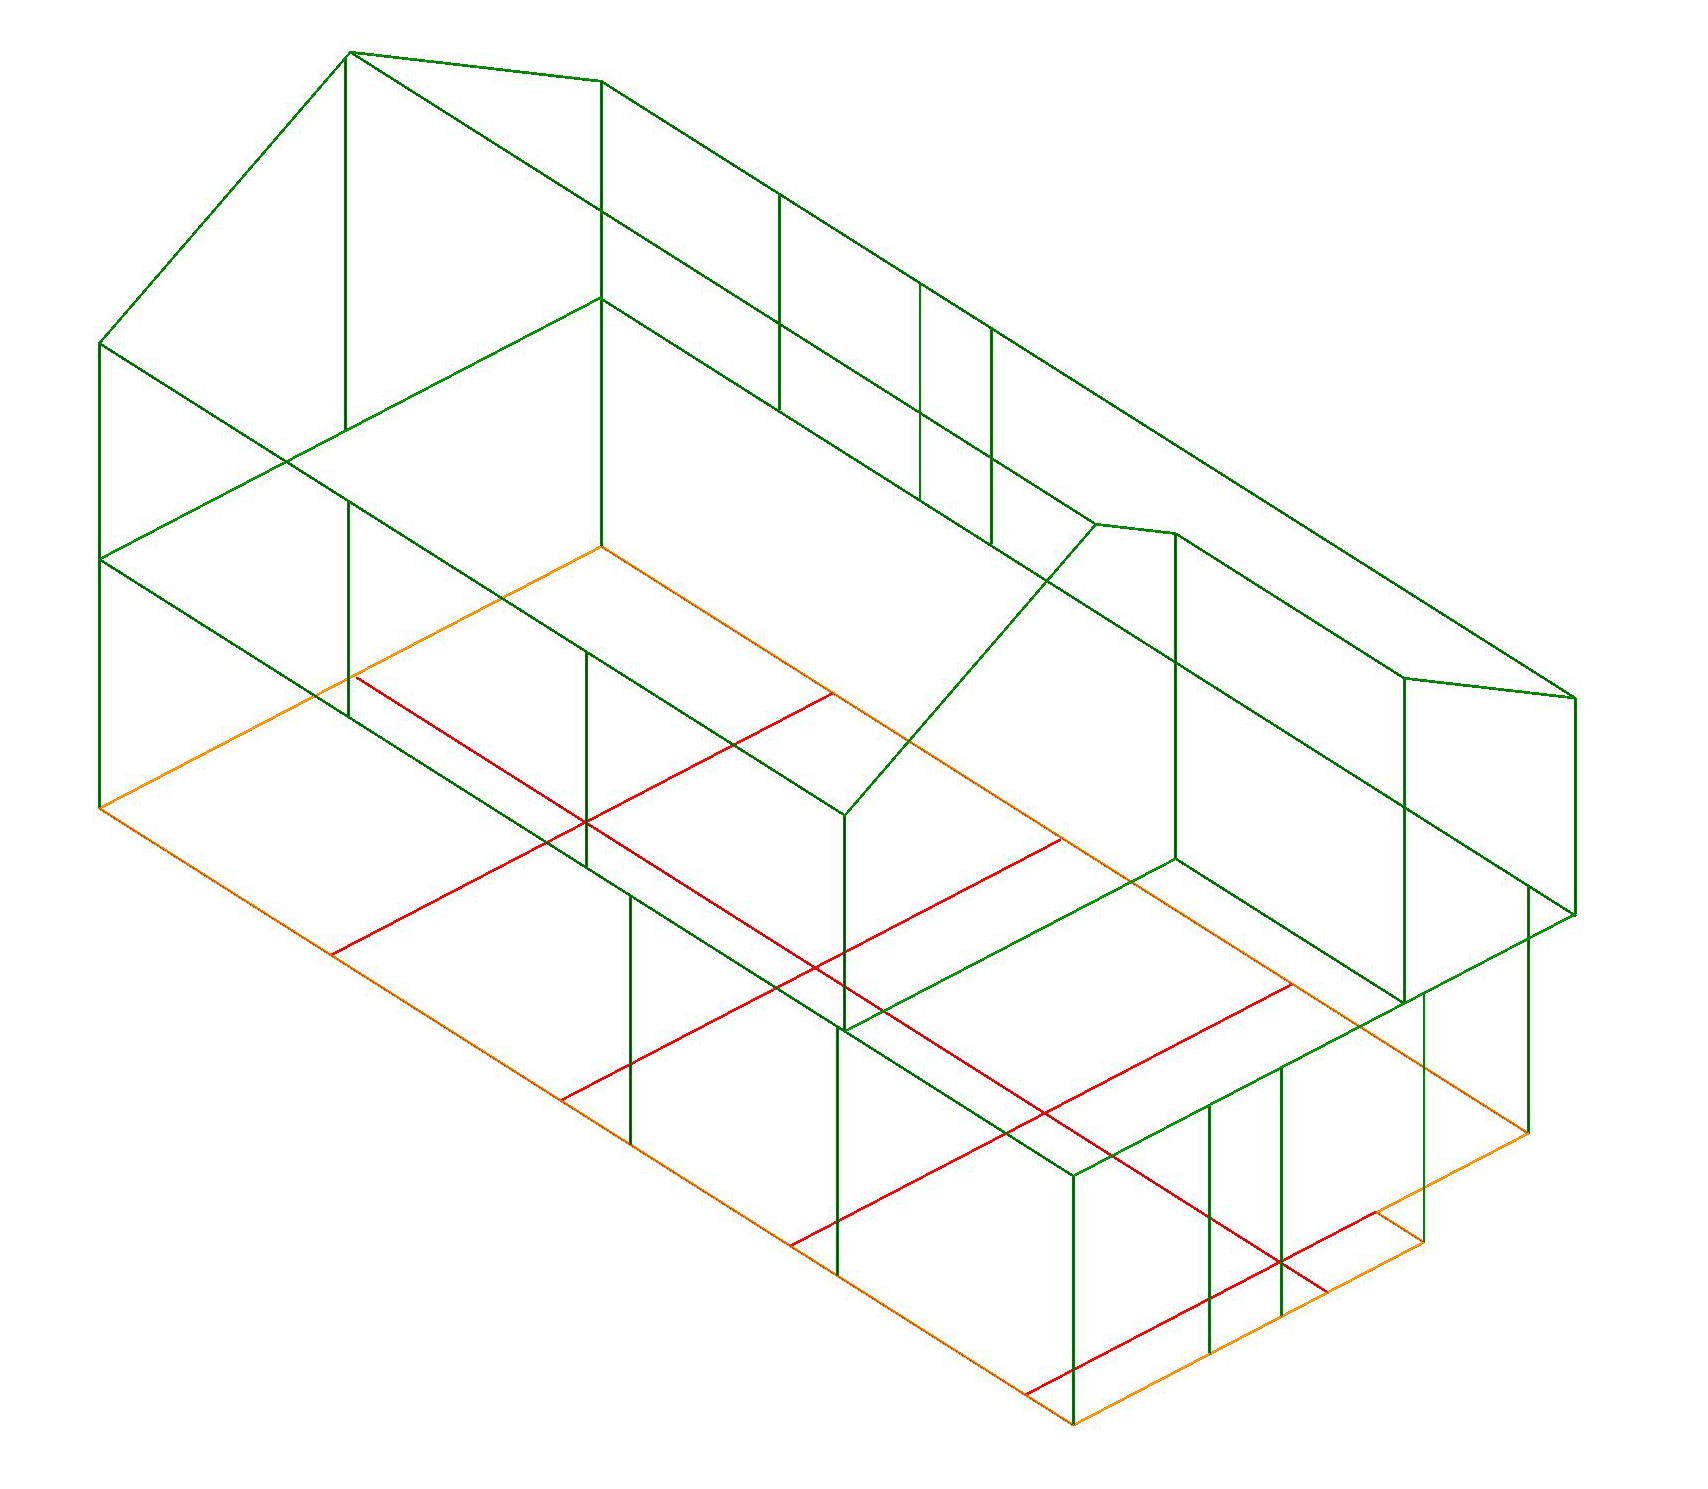
Once the thermal bridges are created, the appropriate values for there Psi can be entered.
The following parameters are locked in Revit and can only be updated within ECCHO as they require specific values to be chosen:
- Description Type
- Group Type.
The following values will be calculated by ECCHO Live Sync automatically:
- Quantity. (This will always be 1 as each element is entered individually.)
- Length.
Treated Floor Area
The Conditioned Floor Area is calculated by ECCHO Live Sync by searching the BIM for any rooms that have their ‘ECCHO CFA %’ parameter value greater than 0.
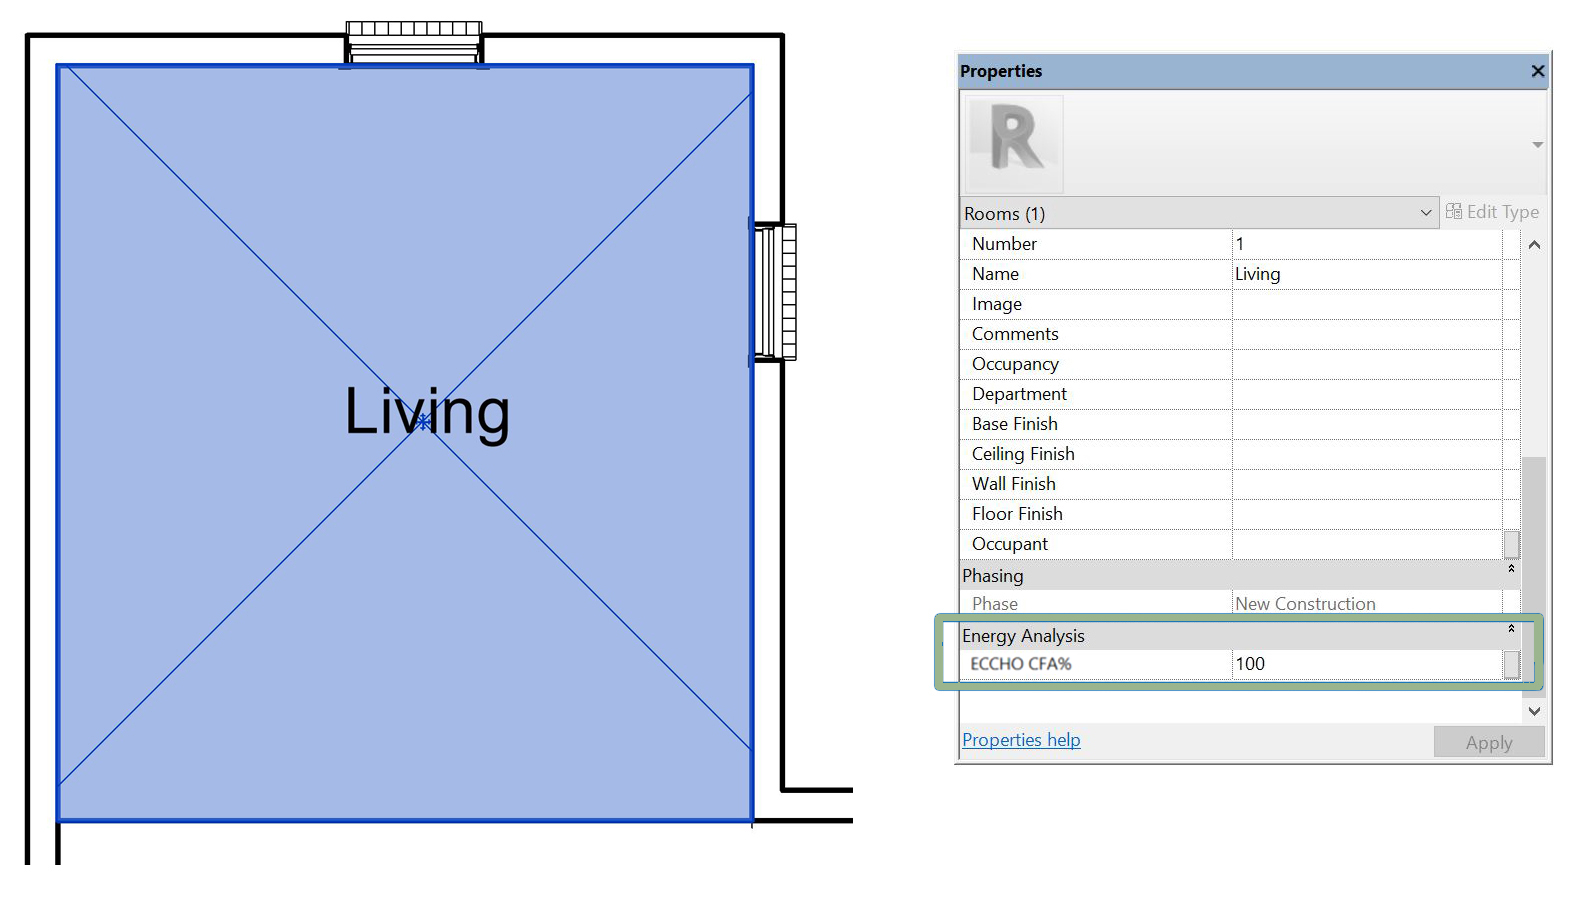
Most rooms within the Thermal Envelope will be set to 100 (ie. 100% of the room area taken into account) while others can be set to the required percentages based on the room use.
Syncing with ECCHO
Click on the ‘Export Data to ECCHO’ button to sync data from the BIM to the ECCHO Data File you initially selected.
You can then import the data file into ECCHO using the Import/Export feature and then manipulate the data in ECCHO as desired.
Once changes have been made in ECCHO, you can re-export and replace the previous data file.
Click on the ‘Import Data from ECCHO’ button to sync the data from the updated ECCHO data file back into the BIM.
You can keep repeating the process of updating the BIM or ECCHO and keeping them synced as you make changes to either one.
Please note that ECCHO Live Sync will automatically save the ECCHO Data File during syncing.
Tips and Limitations
- Microsoft OneDrive users will need to have their ECCHO data file closed when syncing with ECCHO Live Sync, as OneDrive blocks the file from being edited by ECCHO Live Sync when it is open. Alternatively, save the ECCHO Data File in a location outside of OneDrive.
- If a window, door or roof window/skylight family object is within a wall/roof that is part of the Thermal Envelope, and it has its ‘ECCHO Sync’ parameter checked, ECCHO Live Sync will automatically change the family object’s ‘ECCHO Sync’ value to be checked also. (Otherwise the wall/roof area would not be calculated correctly.) A message dialog will be displayed to list the affected family objects. Conversely, if a wall/roof does not have its ‘ECCHO Sync’ parameter checked but has one or more windows, doors or roof window/skylights hosted within it that do have their ‘ECCHO Sync’ checked, ECCHO Live Sync will automatically change the wall’s/roof’s ‘ECCHO Sync’ value to be checked also. A message dialog will be displayed to list the affected wall/roof.
- If you are using your own family objects, please ensure that the ‘Width’ and ‘Height’ parameters of the Window, Door, or Roof Windows/Skylights you use match the actual width and height of the cut out (void form) to the host wall/roof opening or area calculations will be incorrect.
- If you are using your own family objects, having the ‘Width’ and ‘Height’ parameters set as ‘Instance’ types will allow you to edit their width and height within ECCHO, otherwise you can only updated them from within Revit.
- Walls are always assumed to be 90° inclination to the horizon. Floors are always assumed to be 180° inclination to the horizon. And Ceilings are always assumed to be 0° inclination to the horizon. A Roof inclination to the horizon will be based on the roof’s pitch.
- ‘Curtain Wall’ wall types are not supported at this time.
- Deleting objects (i.e. a wall or a window) should be done in Revit, as deleting objects within ECCHO will have no effect on the BIM.